Library
Please note:
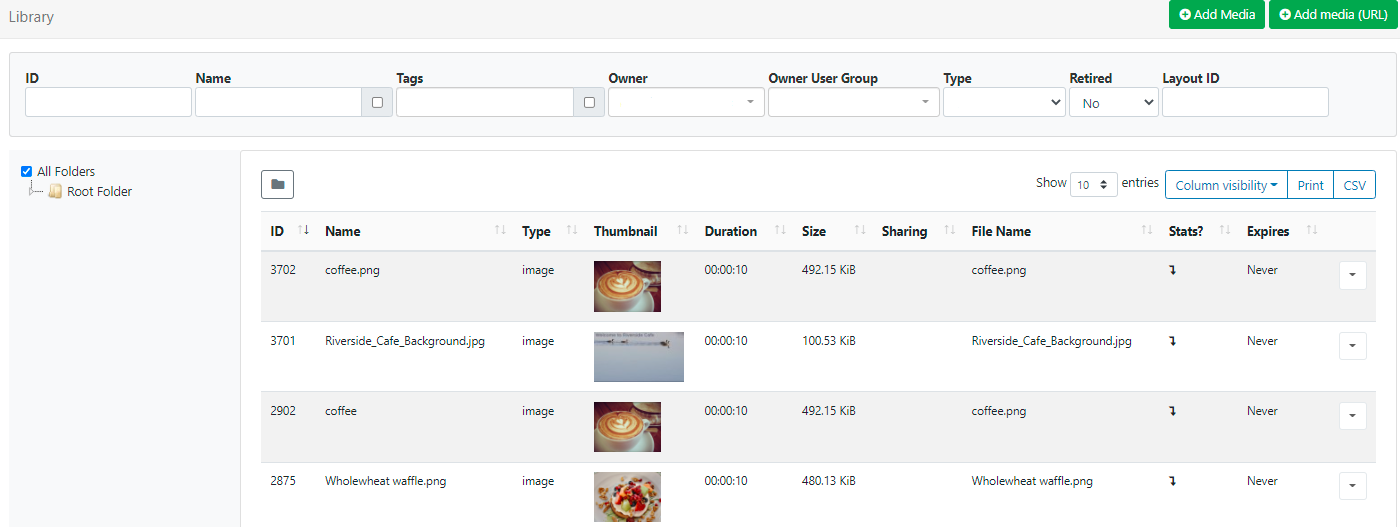
The CMS Library stores all file-based media that is uploaded for use on Layouts.
Navigate to Media under the Library section of the main menu to open the Library Grid:
Uploading Media
Library media can be either uploaded directly to the Library using the Add Media button and uploading via our easy to use tool or using the Add Media (URL) button to provide a URL.
Add Media by uploading a file
- Select the Add Media button at the top of the grid.
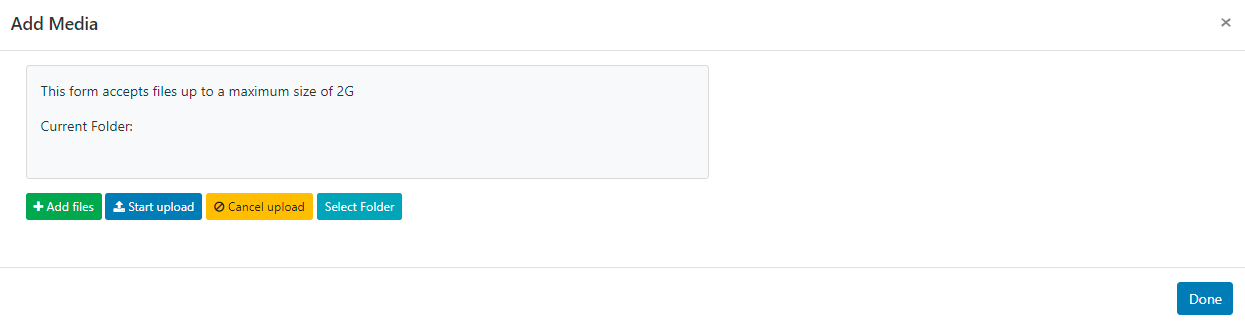
- Click Add files and select the file(s) you wish to upload.
Files can also be added via drag and drop!
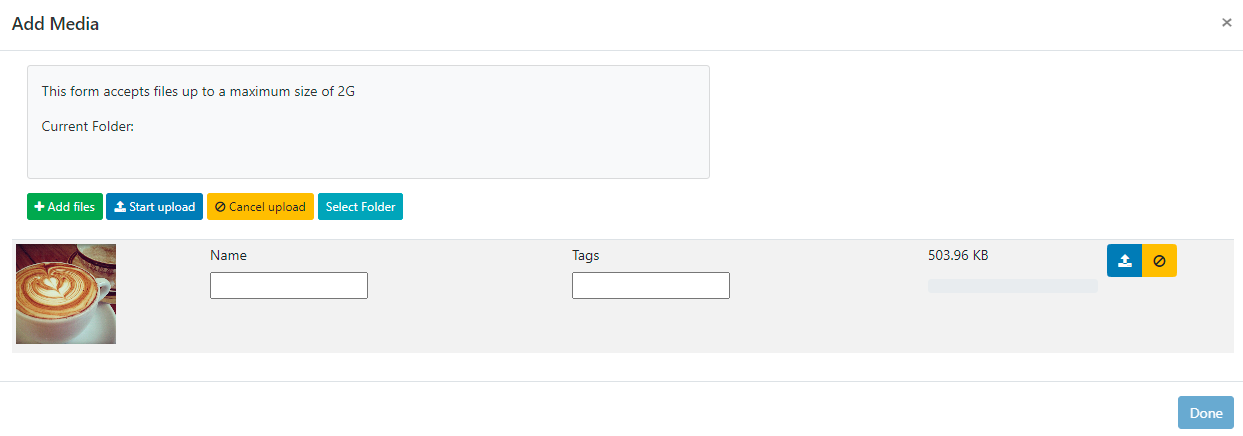
- Give your file a Name for easier identification in the CMS and an optional Tag.
If the Name field is left blank, the file will be named as per the original file name on upload!
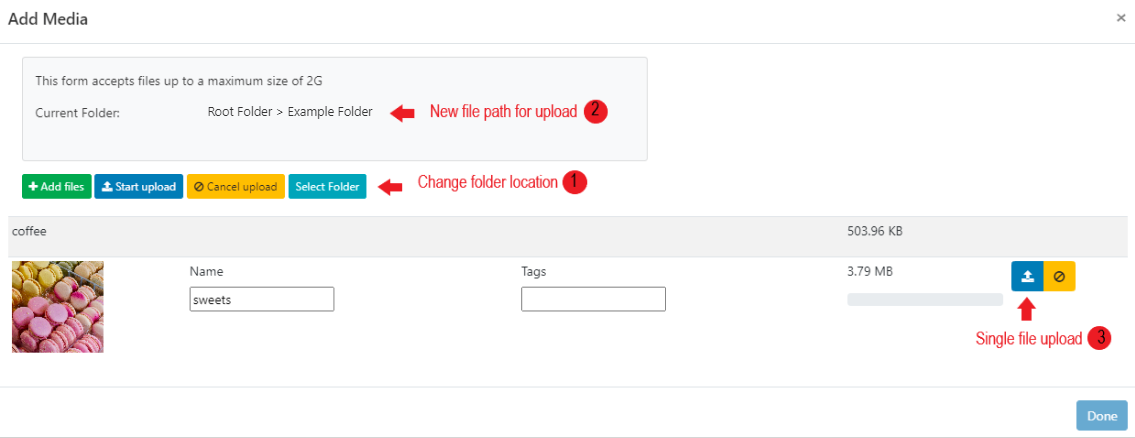
Media can also be directly uploaded to a specified Folder location.
Media files that are saved in Folders will inherit the View, Edit, Delete Share option that have been applied to the destination Folder for User/User Group access!
- Click on the Select Folder button and expand to select a Folder to save in.

Users can also right click a Folder to access further options.
Available Folder options are based on enabled Feature and Sharing options for a User/User Group.
- Click in the Folder you wish to upload the file to and click Done.
-
The Current Folder will now show the selected file path.
- Click the Start upload button to begin the upload of all files. If a Folder has been selected and you have added multiple files, all files will be uploaded to that location.
Files can also be uploaded individually and have different Folder locations specified. Instead of clicking on the Start upload button, click on the blue upload button shown at the end of the row for an added file.
- Change the Folder location using the Select Folder button as before and then click the blue button at the end of the row to upload just that singular file.
- Once all files have been successfully uploaded, click Done.
Media files can also be uploaded directly to a Widget assigned in a Layout, which will also save to the Library by default.
Add Media via URL
- Select the Add Media (URL) button at the top of the grid.
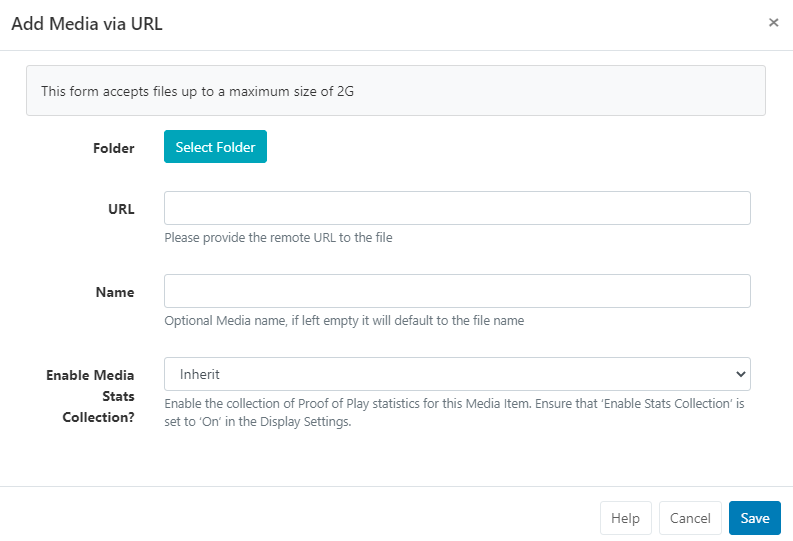
- Use the Select Folder button if you need to select /create a specific Folder to add this media file to.
- Provide the remote URL for the file.
- Include a Name to be used instead of the file name if required for easier identification in the system.
- Use the drop down to select the setting to be applied regarding stats collection.
- Once all fields have been completed click to Save.
All media items that have been uploaded to the Library are available to include in Layouts by simply using the Library Search tab on the Layout Designer tool bar.
Adding additional fonts
Sigme comes with a set of standard fonts provided by our text editor tool - CKEditor, which are currently:
- Aileron Heavy Regular (Aileron-Heavy.otf)
- Aileron Regular (Aileron-Regular.otf)
- Dancing Script Regular (DancingScript-Regular.ttf)
- Railway Regular (Railway.ttf)
- Linear Regular (linear-by-braydon-fuller.otf)
Additional fonts can also be added to the Library using the Add Media by uploading a file method. Once added, the font will be available to use in the text editor.
If the new font does not show in the text editor after upload, try clearing the browser cache!
Please note: Fonts have preferences built into then known as OS/2 tags. Sigme checks for OS/2 preferences and can use fonts with OS/2 tags 0 or 8. Fonts with other OS/2 tags may produce an error on uploading and may not display correctly.
Folders
-
Click the Folders icon to toggle on/off from view.
When Folders are hidden from view, the file path for the selected folder will be shown!
- Click on a Folder/sub-folder to search the contents and return results based on any filters applied to the grid.
or
- Tick All Folders to include searching in the Root Folder and return results based on any filters applied to the grid.
Folders allow users to organise, search and share objects easily!
Row Menu
Each Media file has a Row Menu with a list of actions / shortcuts that can be performed against it.
Edit
The Edit Media form allows you to make edits to the Folder, Name and Duration of the selected file amongst other actions.
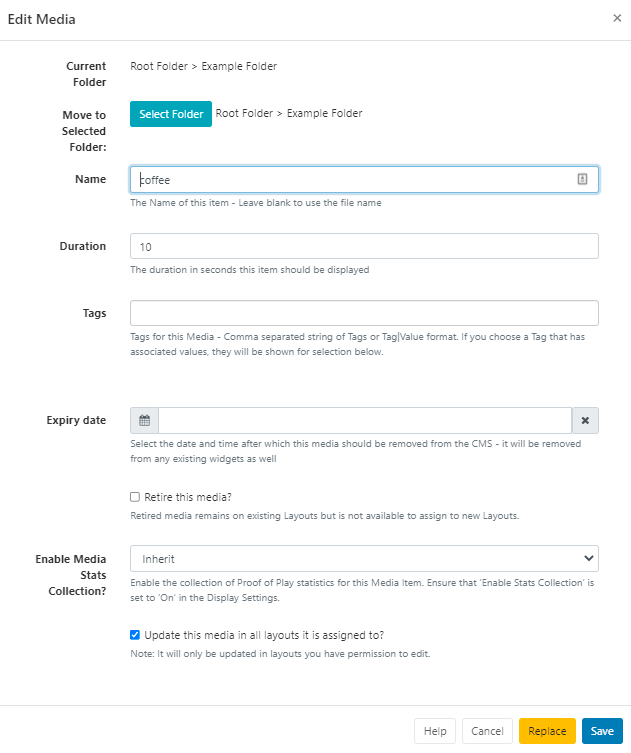
- Current Folder - If the media file is already in a Folder, the file path with be shown here. Click Select Folder to move to a different location.
- Tags - Media can be tagged to allow for ordering and make files easier to find.
When entering text into the Tag field on the form, an auto complete helper will show possible matches to make it easier for Users to select from.
- Expiry date - Select a date and time to completely remove the selected media file from the CMS.
Please note: This will remove media from any Layouts that contain the selected file.
If you do not want to completely remove the media file and keep it assigned to existing Layout's then tick the Retire this media option. The Media file will not show for selection for new Layouts.
- Enable Media Stats Collection - Use the drop-down to set the collection of Proof of Play statistics to On / Off / Inherit for the selected Media file.
To collect Proof of Play records ensure that the Enable Stats Reporting has been ticked in Display Settings
Use the check box Update this Media in all Layouts it is assigned to so that edits made are reflected in Layouts that this Media file is currently assigned to. Edits will only be updated in Layouts which you have permission to edit.
It may be necessary to upload a new revision of an existing file. This can be done by using the Replace button at the bottom of the form.
Upload a replacement file using the same steps as before and select whether the replacement file should be updated to all Layouts it is currently assigned to and if the old version should be removed.
Copy
Make copies of the selected media file, give the copied file a new Name and Tag.
Select Folder
Move the Media file to a selected Folder.
Delete
Media files can only be deleted from the CMS if they are not being used on any existing Layouts .The option to force a delete from any existing Layouts must be used with caution as deleting a file cannot be reversed.
Retiring Content means that it will no longer be available to assign to new Layouts but will remain in existing Layouts it is assigned to, meaning scheduled content can remain unaffected. Click on Edit and tick the box to retire on the Edit Media form!
Share
Enable Share options for selected Users/User Groups.
Download
Download a copy of the media file for ease of sharing.
Enable Stats collection
Enable the collection of Proof of Play statistics.
Usage Report
This will show if the selected media file is directly assigned/scheduled to Displays.
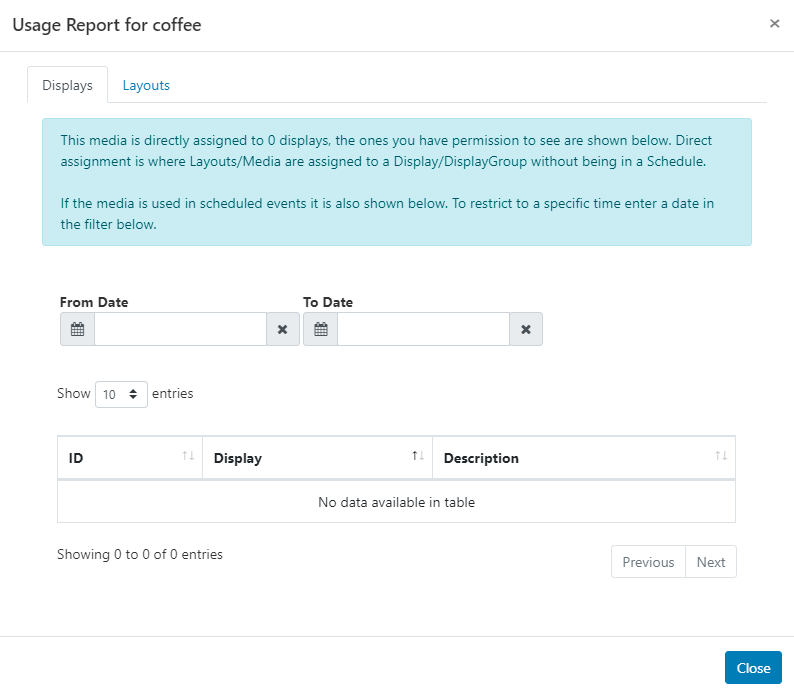
Use the Layout tab to see what Layouts the media file is currently included in.
Use the Row Menu to view/edit in the Layout Designer by selecting Design or open a previewer to Preview Layout.
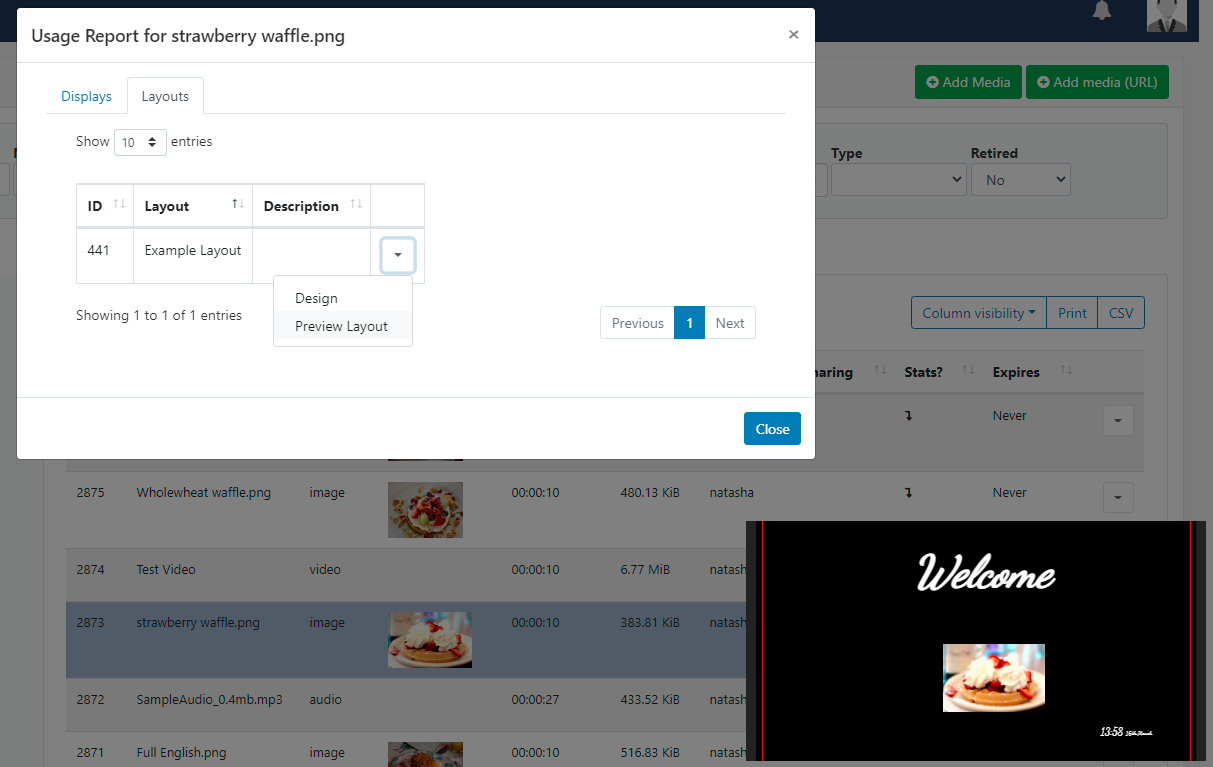
The Usage Report is great to make final checks prior to tidying media files.
Use the With Selected option at the bottom of the Library Grid to Edit Tags, Move to Folder, Delete and Share in bulk!